QR Codes by SKU: Make Unboxing Support Dead Simple
Unboxing is where support goes from calm to chaos. Customers ask the same questions over and over: setup, missing parts, warranty, what’s normal, what’s not. The real pain is that you can’t instantly tell which exact product or variant they’ve got.
This guide shows how to use SKU-level QR codes on packaging so one scan opens the right help for the item in their hands. You’ll get placement tips, dynamic vs static guidance, real retail examples, and a copy/paste rollout kit.


Share
Support’s calm… until the customer opens the box and all hell breaks loose.
Suddenly, it’s the same questions on a loop. How do I use it? Is a part missing? Is this normal? What’s the warranty? What if it’s faulty? Meanwhile, you’re faffing about in orders trying to work out which variant they’ve got before you can give a straight answer.
A SKU-level QR on the packaging cuts through all that. It sends people to the right help for the exact item in their hands, not your homepage.
Key takeaways
A proper SKU-level QR means one scan, and the help already knows which product it is. No searching. No guessing. No back-and-forth.
One QR for everything usually falls flat. It asks customers to do homework at the exact moment they’re already stuck.
Packaging sticks around for years, so you’ll almost always want a dynamic QR. Keep the printed code stable and change where it points later. Using your own domain helps with trust and control, too.
The first screen should be a quick menu, not wandering around your website. Three to five clear options and a visible “Talk to support” button are plenty.
Don’t tie yourself in knots with variants. Map things sensibly: product first, then family, then region or language, then the main job like setup, troubleshooting, warranty, or returns.
Scan numbers on their own don’t mean much. What matters is what happens next. Did it get solved? Did they still contact support? Which products cause the most noise?
Start small. Pick ten SKUs, get the full flow working end to end, then roll it out wider once you know it actually helps.
What “SKU-level QR support” actually means and when it’s worth it
At its simplest, SKU-level QR support just means this:
The QR code is linked to a specific product or variant, not a general page.
So when someone scans it, you already know what they’re holding. You can show the right help straight away, without asking follow-up questions or making them hunt around.
An easy way to picture it:
The QR is the doorbell.
The SKU is the flat number.
The landing page is you opening the door, already knowing why they’re there.
No shouting through the letterbox. No guessing which neighbour they meant!
If you’ve read QR Code Customer Support: In-Store and Post-Purchase, this is the zoomed-in version. Same idea, but focused purely on packaging and those first few minutes after unboxing, when customers are most likely to need help.
And that’s when it’s worth doing. If unboxing triggers questions, confusion, or support tickets, SKU-level QR support earns its keep very quickly.
SKU-level vs one QR for everything, and why generic QR links disappoint?
Most generic QR codes on packaging go to one of three places.
The homepage.
A general help centre.
Or a big PDF manual that nobody’s keen to read on their phone.
On paper, that sounds reasonable.
In real life, here’s what actually happens. Someone scans the code, lands somewhere broad, and then has to start digging. They’re looking for the right product, the right model, the right language, and then trying to guess which article might answer their question.
That’s not support. That’s a scavenger hunt.
If your QR goes to the homepage, you’ve made the customer do homework. And customers don’t do homework when something’s flashing, beeping, or refusing to turn on in the kitchen.
The 3 product types where SKU-level QR really pays off!
You’ll see the biggest return from SKU-level QR support in a few familiar categories.
Setup-heavy products
Anything that needs steps to get going. Beauty devices, small appliances, electronics, and products that need charging, pairing, or calibrating before they work properly.Care-heavy products
Items that come with rules. Clothing with specific wash instructions, shoes or leather that need care, cosmetics where misuse causes problems, or anything with a long list of “don’ts.Repeat-purchase items with lots of quick questions
Supplements, refills, filters, blades, spare parts. The same questions crop up every month because people don’t remember the details between orders.
QR codes work best when they offer clear, immediate value. When the destination is vague or generic, customers don’t bother. When it’s specific and helpful, they do.
The moment-to-moment flow: scan, recognise the product and help straight away
This doesn’t need to be clever. It just needs to work!
Someone scans the QR on the box.
Behind the scenes, you work out which product or product family it is.
The first screen then shows the things people usually need at that moment: setup, troubleshooting, warranty, and missing parts.
If they’re still stuck after half a minute, give them a clear way out. A chat button or a short form where they can ask for help without starting from scratch.
The key thing here is timing. Customers don’t want a long journey. They want an answer, quickly. And if self-serve doesn’t sort it, they want to talk to someone without having to repeat themselves.
That’s the whole flow. Simple, tidy, and much easier on your support inbox.
What should open after a scan? fast menu, not a homepage
When someone scans the QR, they should land on a simple mobile page that gets out of its own way.
It needs to load quickly, be easy to read at a glance, work comfortably with one thumb, and stay ruthlessly focused on help. No banners. No wandering menus. No marketing waffle.
QR codes work best when they act as a direct gateway to useful information, not a dumping ground. That’s why it’s recommended to structure destinations properly and use links you control, ideally on your own domain.
A good first screen isn’t clever! It’s obvious.
It’s basically asking: What do you need right now?
You give them three to five big buttons.
You add a short line that reassures them they’re in the right place.
And you make sure there’s a visible “Talk to support” button that isn’t buried or hidden behind clever wording.
If someone’s already annoyed, the last thing they want is to feel trapped. Give them an easy way out, and they’re far more likely to try self-serve first.
The first screen rules: One tap to a solution
Most QR failures aren’t technical. They’re design mistakes.
If you stick to a few simple rules, you’ll dodge the majority of problems before they happen.
First, make sure there’s something people can tap straight away. “Setup in 3 minutes” should be a clear button, not a paragraph they have to read through.
Second, don’t force scrolling just to get started. On a normal phone screen, the main actions should all be visible without flicking up and down.
Third, never hide the human option. When someone’s stressed or in a rush, they want to see an obvious way to talk to a real person. If they feel trapped, they’ll give up.
It also helps to show the product name or model right at the top. That quick bit of reassurance tells them they’ve landed in the right place and stops second-guessing.
And finally, keep the layout consistent across products. If someone scans your QR for a second or third item, they shouldn’t have to re-learn how your support works.
If you want to step back and see how this fits into the wider experience, it’s worth mapping these scan moments in Customer Journey Map and thinking about them as designed moments using Customer Touchpoints.
Static QR code vs dynamic QR code, and why does packaging usually need dynamic?
This is where a lot of teams trip themselves up without realising it.
They print a QR, it works on day one, and everyone relaxes. Then six months later, something change,s and suddenly that little square on the box is a problem you can’t fix.
Here’s the difference, without the jargon.
A static QR hard-codes the final link into the code itself. If the page still exists, fine. But if you need to change the structure, fix a mistake, add tracking, swap platforms, or recover from a broken link, your hands are tied. What’s printed is what you’re stuck with.
A dynamic QR is more forgiving. The printed code points to a stable link you control, and that link can forward people wherever you want today. You can update the destination later without touching the packaging.
That matters because packaging hangs around. Boxes sit in warehouses. Products stay in cupboards. QR codes get scanned months or even years after you print them.
It’s recommended to use a setup where you can manage redirects and content centrally, often via your own domain or subdomain, so you don’t have to reprint packaging just to fix a link.
In short: if it’s going on a box, make sure you can change where it goes later. You’ll thank yourself when something inevitably changes.
Redirection patterns. Keep the printed code stable and update the target!
The safest way to handle packaging QRs is to separate what’s printed from where it actually ends up.
In practice, that means printing a short, stable URL that sits on your own domain. Something like a simple ID link for the product. That printed link never changes.
Behind the scenes, that link just forwards people to the current landing page for that product. If you need to move pages around later, you change the destination, not the QR.
This approach is widely recommended by GS1 UK because it gives you control. Using your own domain or subdomain builds trust, and treating the URL as a managed placeholder means you can update where it resolves without touching the packaging.
The real benefit shows up down the line. When you change platforms, rebuild your help centre, or tidy up your URLs, you don’t end up with thousands of boxes pointing to dead pages.
That’s the whole point of doing it this way.
SKU mapping system so you don’t drown in 200-plus SKUs!
If you try to run this as “one QR per SKU, forever” with no structure, it’ll get messy very quickly. The trick is to stop treating every QR as a one-off and start separating identification from content. Once you do that, things calm down.
Instead of thinking only in SKUs, think in layers.
Start with the product family. That’s the main thing someone recognises.
Then account for the variant, like colour, plug type, or model year.
Add region or language, because UK, US, and EU customers often need different instructions.
And finally, decide the primary job for that QR. Is it mainly for setup, troubleshooting, or warranty?
In the real world, most variants don’t need completely separate pages. They can share the same first screen and only split where it actually matters. A good example is setup instructions that differ by plug type. The entry point stays the same, and the detail changes further down. This approach keeps the system manageable, even when your catalogue starts to grow.
When to map by SKU vs by collection or product type?
You don’t need to be overly strict here! The goal isn’t perfection, it’s clarity. Map things by individual SKU when the differences actually matter to the customer. That usually means the setup changes, the parts inside the box aren’t the same, troubleshooting steps differ, warranty or serial handling is different, or there are specific safety rules they need to follow.
In those cases, lumping products together just creates confusion later.
On the other hand, map things by product family or type when the product is essentially the same. If the only difference is colour, finish, or size, and the care instructions and common questions don’t change, one shared entry point is usually enough.
A good sense check is this: If a customer with one variant would be happy reading the help for another, they can probably share the same QR flow.
Standards bodies like GS1 UK encourage using a clear product identifier, such as a GTIN, to link the physical product to the right digital information. The cleaner that link is, the easier it is to give customers accurate help without overcomplicating your setup.
Quick heads-up: the SKU QR Rollout Kit
If you want to skip the blank-page feeling, everything you need is already laid out below.
There’s a ready-made spreadsheet for mapping SKUs, a simple landing page wireframe, and copy you can lift straight onto packaging or inserts. Drop it into Google Sheets, tweak the names, and crack on.
And if you’d rather not glue all this together yourself, you can also route QR scans straight into a shared inbox with live chat using AskDolphin’s live chat. It keeps the product context attached, so support replies stay quick and tidy.
Nothing to set up right now if you don’t want to. Just know it’s there when you’re ready.
Packaging placement playbook, so people actually scan!
You can build the perfect landing page and still mess this up. If the QR is tiny, shiny, hidden, or slapped somewhere nobody naturally looks, it won’t get scanned. Simple as that. Placement matters just as much as what opens after the scan.
Unboxing card vs box exterior vs serial label
You don’t have to pick just one. Each placement works best at a different moment, and using more than one is often the smartest move.
Unboxing card (best for support)
This is your strongest option for help-related scans. Put it right on top of the box so it’s the first thing they see when opening the parcel. This is where setup instructions, “what’s included”, and quick-start guidance belong. It hits at the exact “help me now” moment, before frustration has time to build.
Box exterior: Best for pre-open questions!
The outside of the box is more about reassurance than problem-solving. A QR on a side panel near the product name or barcode works well for things like authenticity checks, language selection, or a general “start here” page. Just be mindful that this code can be scanned in shops, warehouses, or by couriers, so keep the content appropriate for public viewing.
Label near the serial or batch number: Best for warranty and faults
This is ideal for anything that needs precise identification. Placing a QR near the serial, batch, or lot label makes warranty registration, missing parts, and fault reporting much easier. It also helps support teams, because customers can quickly snap a photo showing both the QR and the serial if they need to get in touch.
Placing QR codes close to the existing barcode where possible, making them easier to scan and more future-proof as retail scanning standards evolve. Match the QR placement to the moment you’re trying to support. When you do that, people actually use it.
Print and UX basics
From what we see with merchants, most scan issues don’t come from fancy edge cases. They come from small print decisions that seemed fine at the time. For example, QR codes tend to scan far more reliably when they’re not sitting under a shiny finish. Even slight glare can throw phone cameras off, especially in kitchens or under warm lighting.
We’ve also found that QRs placed on flat surfaces get scanned more consistently than ones wrapped around corners or box edges. Curves look tidy on artwork, but they’re harder to scan in the real world.
And finally, a short line of context makes a big difference. When the QR says something like “Scan for setup” or “Scan for help”, people know exactly why they should bother. Vague prompts like “Scan me” tend to get ignored, because they don’t answer the obvious question: what do I get if I scan this?
In-store vs At-home scans
Not all scans mean the same thing.
When someone scans a QR in a shop, it’s usually driven by curiosity or reassurance. They’re asking themselves things like: Is this the right one? Is it legit? What am I actually getting? The scan is calm, optional, and low-pressure.
Once they’re at home, it’s a different story. Scans there are nearly always urgent. Something’s not working. A step didn’t make sense. A part looks wrong. They want an answer now, not a browse.
That difference matters! It’s why exterior QRs tend to work better when they’re general and safe, things like product info, authenticity, or a simple “start here”. Meanwhile, the QR inside the box can go much deeper into setup, troubleshooting, and “help me fix this” territory without confusing people in-store.
If you want to be more deliberate about this, it helps to think of scans as moments, not just links. You can map them as touchpoints in Customer Touchpoints and place them across stages using Customer Journey Map. It stops you designing one QR for every situation and hoping for the best.
What the SKU QR should route to?
This is usually where things become overly complicated. Teams try to make one QR do everything at once, and it ends up doing nothing particularly well. The better approach is simpler: decide the main reason someone is likely to scan, and design around that. You can still offer other options in the menu, but the page should clearly serve the number one job people are there for.
Setup: Quick start
This is the most common and most effective use case, especially for products that aren’t obvious straight out of the box. It works best for devices, appliances, and anything that needs a few steps before it behaves itself.
From what we see, setup pages work well when they’re kept tight and practical. A short step-by-step gets people moving, a quick video helps if they’re unsure, and a nod to common mistakes reassures them they haven’t broken anything. And there should always be a clear way to ask for help if it still doesn’t click.
Not fancy. Just useful!
Scenario: beauty device (setup-heavy)
This is a classic example where SKU-level QR really earns its keep.
The QR lives on the unboxing card, with a smaller one near the serial sticker for later reference. When scanned, the first screen is calm and focused. Something like “Set up in 3 minutes” at the top, followed by clear options for setup, charging and battery, safety, and usage, and a visible way to talk to support.
What matters most happens behind the scenes.
If the customer taps “Talk to support”, the message should arrive with the product context already attached. Model, variant, plug type if relevant. That way, your team isn’t starting every conversation by asking which version they’ve got. You can get straight to helping.
This is the same principle behind AskDolphin live chat. Customers get quick answers while they’re actively using the product, and if a human needs to step in, the handoff is smooth because the context is already there.
The big takeaway is this:
A QR code that’s clear about its main job saves time for both sides!
Troubleshooting decision tree
This is not the place for long explanations. When something isn’t working, customers don’t want to read an essay. They want a clear path that helps them figure out what to try next. What we see working best is a short decision tree made up of obvious options. The kind of things people are already thinking in their heads.
Buttons like:
“It won’t turn on.”
“It’s flashing or beeping!”
“It won’t connect!”
“Something doesn’t look right.”
Each option leads them down a simple route with a few practical checks. No jargon. No assumptions. And every path should end cleanly in one of two places. Either the issue gets resolved, and they can carry on, or they’re given a straightforward way to get in touch. Something like “Send us a photo and your order number”, with the product details already known, so they don’t have to explain everything from scratch.
That’s the balance you’re aiming for.
Helpful when it can be. Human when it needs to be.
Warranty, authenticity, and missing parts
This is one of the areas where QR codes really earn their keep. If you’ve ever dealt with missing items, damaged deliveries, or the occasional “is this genuine?” message, you’ll know how messy those conversations can get without context. A well-placed QR takes a lot of that friction out. It’s especially useful for products that get reordered regularly, where customers don’t always remember what’s normal and what’s not.
Scenario: supplements (repeat purchase, authenticity matters)
For supplements and similar products, placement does most of the heavy lifting. A QR inside the box flap works well for day-to-day questions. A second QR near the batch or lot label is ideal for authenticity checks and anything warranty-related, because it ties the scan to a specific production run. When someone scans, the first screen should feel calm and reassuring. Something like “Check authenticity” at the top, followed by clear options such as verifying the batch, safe usage guidance, reporting shipping damage, or flagging a missing item.
What happens next is where things stay tidy on your side!
Missing items can be routed straight to fulfilment or ops, rather than clogging up your general support inbox. Authenticity checks can stay self-serve unless something looks off and needs a closer look.
There’s a good reason this works. Using QR codes with standard product identifiers, like GTINs, to link physical products directly to the right digital information. Done properly, it reduces confusion for customers and cuts out a lot of back-and-forth for teams.
Returns: Only if they’re actually driving scans!
Returns can sit in the menu, but they shouldn’t run the show. We’ve seen a lot of brands turn their packaging QR into a full-blown returns shortcut, only to realise later that it pulls people straight into refunds before they’ve even tried to use the product. That’s rarely what you want. Unless returns are genuinely the main reason customers are scanning, it’s usually better to keep them as one option alongside setup, care, or troubleshooting. When returns are a top driver, simplicity is everything. The flow should be clear, predictable, and use the same language your team already uses. Mismatched wording between the QR page and your support replies just creates confusion and extra follow-ups.
That’s why it helps to keep your QR returns copy aligned with your internal templates and macros. If you already have standard wording in place, reuse it. The goal is consistency, not cleverness. The structure in Shopify returns templates & macros is a good reference for this, even if you’re not on Shopify.
Scenario: apparel care
Apparel is a classic case where QR can reduce returns rather than accelerate them. The QR works best on the care label tag, with a small reminder card in the parcel. When scanned, the first screen focuses on prevention, not refunds. Something like “Care & washing (2 mins)” sets the tone straight away.
From there, clear options help people self-serve:
wash and dry guidance, fit tips, exchanges if needed, and a visible way to talk to support.
Behind the scenes, exchanges are handled with a bit more context. Size and variant details are already attached, so replies don’t come back generic or vague. It feels more personal to the customer, and it saves time for the team. Used this way, returns don’t dominate the experience. They sit where they belong, available when needed, but not pushed to the front before customers have had a fair go.
Analytics that matter! beyond scan counts
Scan numbers on their own are a bit of a vanity metric. They’ll tell you people noticed the QR, but they won’t tell you whether it actually helped. What you really want to know is whether the QR reduced confusion, repeat questions, and general support noise.
That’s why it’s worth looking past raw scans and paying attention to what happens next. Guidance from GS1 UK also points to this, tracking how people interact after the scan so you can improve the content and experience over time, not just count usage.
A simple way to think about it is as a short chain:
Someone scans.
They pick an option.
They either sort the issue themselves or they reach out for help.
That’s the story you want your data to tell!
The numbers worth paying attention to
From what we see with merchants, these basics go a long way:
Scans: unique sessions, not raw hits
Menu clicks: what people actually came for
Resolution signals: did they finish the steps, avoid escalation, or watch most of the video
Escalation rate: how often “Talk to support” gets used
Time to first response when someone does escalate
But there’s one number that really hits home if it’s off.
The one metric you’ll actually feel
Repeat contact rate by SKU within seven days. If the same product keeps generating follow-up messages after a scan, something isn’t working. Either the help content isn’t clear enough, the product needs better onboarding, or there’s a packaging or quality issue upstream.
When that number drops, you’ll feel it immediately. Fewer chasers. Fewer frustrated replies. Less time spent answering the same question twice. That’s when you know the QR isn’t just being scanned, it’s doing its job.
Launch in 7 days: The tiny team version
This is the version for when you’re short on time, short on people, and still want it done properly. No big project plan. No cross-team workshops. Just a focused week that gets something live and useful.
Day 1: Pick 10 SKUs to pilot
Don’t start with your full catalogue. That’s how things stall.
Pick ten products that cause the most noise after delivery. Usually, it’s the ones with the most setup questions, the most “is this normal?” messages, or the most returns driven by confusion rather than genuine faults. If a product regularly ends up in your inbox, it’s a good candidate.
Day 2: Write the first screen and the top paths
This is where people often overthink it. Don’t start by filming a glossy brand video or rewriting your help centre. Start with the basics that people actually need in the moment. From what we see working best, that’s:
a simple menu with three to five clear options
three obvious troubleshooting paths
a clean warranty or a missing-parts flow
If someone can get started with one tap, you’re on the right track.
Day 3: Build the landing pages (mobile first)
Assume this will be scanned on a phone, possibly one-handed, possibly in bad light. Keep pages light and fast. Big images, heavy widgets, or massive videos tend to slow things down and frustrate people. This page isn’t about looking pretty. It’s about getting someone unstuck.
Day 4: generate QRs and set redirect rules
This is the point where the tooling matters!
You can technically generate a QR code anywhere, but what we see with merchants is that the basic generators fall short very quickly. They’ll give you a square that links somewhere, but that’s about it. No real tracking. No flexibility. No way to adapt once packaging is printed.
A better approach is to use a system where every QR you create is trackable from day one and stays editable over time.
With AskDolphin, you can create both static and dynamic QR codes, tie them to specific products or general support, and change what happens after the scan without reprinting anything. That includes updating destinations, switching between help flows, or routing scans differently as your needs change.
From what we see working well, a few things make a big difference here:
You can decide whether a QR opens a general help menu, a product-specific flow, or goes straight into chat on the customer’s device.
You can control whether scans start with self-serve content, AI-assisted chat, or go straight to your support team.
You can manage the look and feel of the QR before print, so it actually fits your packaging rather than looking bolted on.
And you can see what’s happening after the scan, not just that a scan happened.
That flexibility is especially useful for packaging, because you’re not locked into decisions you made months earlier. If a product starts generating new questions, you can adjust the flow. If you change your help structure, the QR still works.
If you want to see how this works in practice, the full setup is explained here:
QR Code Customer Support by AskDolphin
And if you’re ready to create your first QR and manage it properly from day one, you can start here:
Create your AskDolphin account
The goal at this stage isn’t perfection. It’s control. Once the QR is on the box, you want to know you can still change what happens next.
Day 5: Print test labels and try to break them
This isn’t a polite test. It’s closer to abuse testing!
From what we see with merchants, QR codes that look perfect on a screen often fall apart once they hit the real world. So test them the way customers actually use them.
Scan them in bad lighting.
Try with an older phone.
Use one hand, slightly rushed.
Test tiny print sizes.
Test glossy finishes and packaging seams.
If scanning feels fiddly, slow, or unreliable, it will get ignored. And fixing artwork now is far cheaper than realising later you’ve shipped thousands of units with a QR nobody wants to scan.
One advantage of managing QRs inside AskDolphin is that you can preview, tweak, and standardise styles before anything goes to print. Teams often create a few reusable styles, one for packaging, one for inserts, one for in-store, and reuse them across products so things stay consistent.
Day 6: Set up routing and replies on the support side
If your QR leads to support, the handoff needs to be ready before customers arrive. Otherwise, scans just become another messy entry point. What we usually see working well is keeping things simple but structured. Basic tagging, clear ownership rules, and a handful of saved replies go a long way. The goal isn’t automation for its own sake, it’s letting context do some of the work.
With AskDolphin QR codes, you can decide what happens after the scan. Some merchants start with a help menu, then let customers choose to chat. Others open chat immediately. Some route to AI first, others straight to their team. And some keep certain QRs self-serve only.
The key is that you’re in control. It also helps to treat QR scans as part of your wider support flow, not a separate channel. The same thinking covered in Shopify customer service automation applies here, even if Shopify isn’t your stack. Triage once, reuse it everywhere.
Day 7: Go live and watch the first 50 scans
This is the most valuable part of the whole rollout:
Sit with it.
Watch what people tap first.
Notice where they hesitate.
Pay attention to labels that made sense in your head but not in theirs.
You’ll learn more from the first 50 real scans than from weeks of internal discussion. Those early interactions tell you exactly what to simplify, rename, or move. Once those first ten SKUs feel solid, scaling up is much easier and far less painful.
See how the QR code flow works end to end
If it helps to see this in action before you build anything, here’s a short walkthrough of how AskDolphin’s QR codes work, from creation to scan to support handoff.
It gives a quick overview of:
Creating general vs product-specific QR codes
managing styles before print
choosing what opens after scan
tracking scans and routing conversations
If you want the full breakdown of the feature set, you can also explore it here.
And if you’re ready to create your first QR and manage it properly from day one, you can start here!
Also, if you want scans to land straight in one tidy inbox, with the product already known and no back-and-forth to work out what the customer’s talking about, you can use AskDolphin’s live chat alongside your QR flows. It keeps post-purchase support in one place and makes handoff a lot smoother when a human needs to step in.
If you’re happy to DIY it, you can still follow this playbook end to end. AskDolphin just takes care of a lot of the glue work behind the scenes, so you spend less time stitching tools together and more time actually helping customers.
Common mistakes we see, so you don’t repeat them!
Sending the QR to the homepage
This one’s still everywhere. It turns a support moment into a browsing task. Customers aren’t scanning a box because they fancy a wander around your site.
Not confirming the product on the first screen
If people can’t instantly see the product name or model, they hesitate. That moment of doubt is often enough for them to back out and message you instead.
Trying to make one QR do everything
Setup, returns, reviews, referrals, community, marketing… It’s too much. When a QR has too many jobs, none of them land properly. Pick the main reason people scan and build around that.
Printing a tiny QR on glossy packaging
It might look neat on the artwork, but in real life, it’s a pain to scan. Small size and shiny finishes are a bad combo. Following spacing and sizing guidance from bodies like GS1 UK saves a lot of frustration here.
No clear way to talk to someone
Self-serve works until it doesn’t. When someone’s stuck, they need to see a clear “Talk to support” option. Hiding it just pushes them to another channel.
No tagging, no learning
If scans and conversations aren’t tagged by product or family, you’re flying blind. You’ll never spot which items are causing the most noise, and you’ll keep fixing the wrong things.
Most of these mistakes aren’t technical. They come from good intentions and rushed decisions. A little structure up front saves a lot of firefighting later.
Copy and paste: The SKU QR rollout kit
This doesn’t need fancy tooling to get started. A simple spreadsheet is enough to keep things sane as you scale.
1) How to map each SKU to the right destination?
Drop this straight into Google Sheets and use it as your source of truth!
Columns to include:
SKU
Product family
Region / language
QR placement
Primary job
Destination URL
Fallback URL
Owner
Last updated
Example rows:
SKU | Product family | Region / language | QR placement | Primary job | Destination URL | Fallback URL | Owner | Last updated |
|---|---|---|---|---|---|---|---|---|
GP-MINI-UK | GlowPro Mini | UK / EN | Unboxing card | Setup | ||||
GP-MINI-UK | GlowPro Mini | UK / EN | Serial label | Warranty | ||||
CARE-TEE-BLK-S | Care Tee | UK / EN | Care tag | Care | ||||
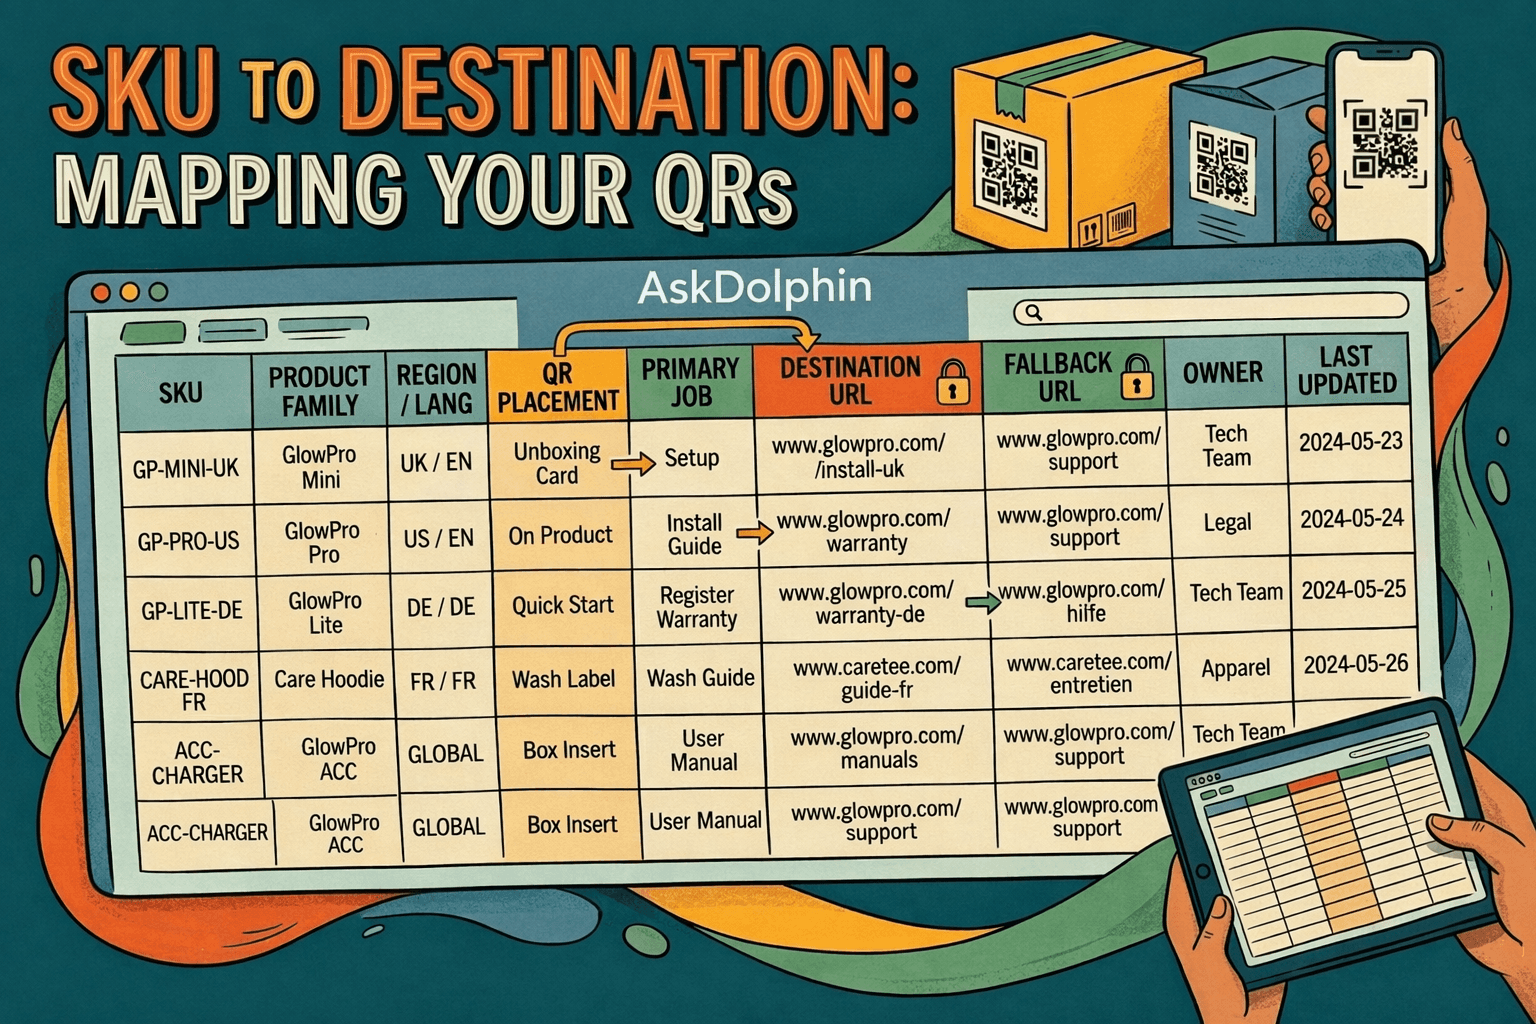
You don’t need to overthink this. The point is to make it obvious which QR does what, where it lives, and who owns it.
A useful habit is to treat the Destination URL as the thing that can change, and keep the printed QR pointing at a stable redirect link you control. That way, when something moves or needs fixing, you update the sheet, not the packaging.
Keeping QR links manageable over time rather than baking yourself into a corner.
If your catalogue grows, this one sheet will save you a lot of head-scratching later.
2) A simple wireframe for your landing page
You’re not designing a website here. You’re designing a “sort me out” screen for someone who’s mid-unboxing. This layout tends to work well because it’s quick, calm, and doesn’t make people think.
The top bit of the page
Start with the product name and the variant, so customers instantly know they’re in the right place.
Example: GlowPro Mini UK plug
Under that, add one short reassurance line. Something like: You’re in the right place. Pick what you need.
That one sentence reduces a lot of doubt and drop-offs.
The main menu buttons
Keep the buttons big and obvious. Most people are on a phone, often with one hand. A solid set looks like this:
Setup in 3 minutes
It’s not working
Missing parts or damage
Warranty and registration
Talk to support
If you want one simple rule, it’s this: the customer should be able to start in one tap, without scrolling or hunting around.
The footer bits
Keep the footer light. Only add what’s useful. Common options are:
Order lookup, if you want it
A short privacy note
A language switcher, if you sell across regions
That’s it. The footer shouldn’t compete with the main menu. It’s there for the edge cases, not the main flow.
3) Packaging microcopy pack you can steal
The aim is simple. Make it obvious what happens when someone scans. If the copy doesn’t answer “what do I get?”, people ignore it.
Unboxing card copy
This is your best spot for support. The customer’s just opened the box, they’re ready to act, and they want a quick win. Use one of these as the main line:
Start here. Scan for setup. Takes about two minutes.
Stuck already. Scan and we’ll sort it.
Set up and troubleshoot with one scan.
If you’ve got room for a second line (and you usually do), add a gentle nudge:
No login. Just quick steps.
Short video inside.
If it’s still not right, you can message us from the same screen.
Box exterior copy
Exterior QRs get scanned in more public situations, in-store, at the doorstep, even by someone curious. Keep it general and brand-safe. Options that work well:
Scan for product info and support.
Need instructions. Scan here.
Check it’s official and get help.
If you want to reduce random scans but keep it helpful, a small qualifier can help:
For support and instructions
For product help and details
Start here for guidance
Serial or batch label copy
This is the “serious stuff” QR. It’s best for warranty, authenticity, and anything where you need the exact model or batch. Good options are:
Scan for warranty and parts.
Missing something. Scan and tell us.
Help for this model. Scan here.
And if you’ve got a tiny bit of space, this line makes support faster:
Have your order number ready.
Tiny label versions (when you’ve got no space)
Sometimes you only get a few words. These are designed for that reality.
Setup help
Get support
Warranty help
Missing parts
Scan for help
4) Pre-print QA checklist (don’t skip)
Scan works on iPhone + Android (camera app, not a special scanner)
Works in low light (kitchen / hallway)
QR has clear quiet zone (no design clutter right up against it) (GS1 Reference)
QR isn’t warped over an edge or seam
Landing page loads fast on 4G
Product name/variant shows at top
Buttons fit on one screen
“Talk to support” works and captures SKU context
Language/region rules route correctly (if applicable)
Analytics events fire (scan, click, escalate, resolved)
Original asset suggestion (AskDolphin can create):
A print-ready A6 “Unboxing Help Card” PDF (front: QR + 3 button labels, back: warranty/missing parts form QR) plus a simple landing page wireframe diagram you can hand to a designer/dev.
Pre-print QA check
Before anything goes to print, slow down for five minutes and sanity-check it properly. Most QR disasters don’t come from big technical failures. They come from tiny details nobody tested in the real world.
Start with the basics! Make sure the QR scans on both iPhone and Android using the normal camera app. If it only works with a special scanner, it’s already lost. Then test it where people actually scan things. Kitchens. Hallways. Evenings with warm lighting. If it struggles in low light, that’s a red flag.
Have a look at the design itself. The QR needs breathing room around it. When design elements sit right up against the edges, scanners start to fail. Leaving a proper quiet space around the code makes a bigger difference than most people realise, and it’s something standards bodies like GS1 consistently flag for retail use.
Check placement too. If the QR bends around an edge, sits on a fold, or crosses a seam, scan reliability drops fast. Flat surfaces win every time. Once you get past scanning, look at the experience. The landing page should load quickly on mobile data, not just on office Wi-Fi. The product name or variant should be obvious at the top so people know they’re in the right place. The main buttons should all fit on one screen without scrolling.
If there’s a “Talk to support” option, test it properly. Make sure it actually works and that it carries the product context through, so customers don’t have to explain what they’ve bought all over again. If you sell across regions or languages, double-check routing. A UK customer shouldn’t land on a US page just because the QR was reused.
And finally, make sure you’re actually capturing what happens. Scans, clicks, escalations, resolutions. If the data isn’t firing, you’ll have no idea whether this is helping or just sitting there looking nice. A quick pass through all of this is far cheaper than discovering problems after thousands of units are already out in the world.
Original asset you can use straight away
A really practical add-on here is a print-ready A6 unboxing help card. One side shows the QR with two or three clear button labels: setup, troubleshooting, support. The other side can handle warranty or missing parts, with a second QR if needed. Pair that with a simple landing page wireframe diagram, and you’ve got something a designer or developer can work from without guessing.
This is the sort of asset AskDolphin can generate quickly, so you’re not starting from scratch every time you launch a new product.
FAQ
Do I need GS1 Digital Link for this?
Short answer: No.
You can run SKU-level QR support perfectly well using your own URL structure and redirect setup. Plenty of merchants do exactly that and never touch GS1 Digital Link. Still useful if you want standards-based product identifiers, long-term flexibility, or you’re thinking ahead to future retail scanning use cases. It’s not a requirement, but it’s a sensible reference point.
Do I need multiple tools to manage QR codes, chat, and tracking?
No. You can manage all of that in one place.
With AskDolphin, you can create and update QR codes, control where scans go, track what happens after the scan, and route conversations into one inbox with product context attached. It saves you from stitching together separate QR, chat, and analytics tools.
You can still DIY it if you want. AskDolphin just removes a lot of the setup and maintenance work.
What should I show first? Setup, Returns, or Warranty?
Let your inbox answer this for you! Look at the number one reason people contact you after unboxing. For most setup-heavy products, it’s setup or troubleshooting, not returns. That’s usually what should sit front and centre.
Returns work better as a button in the menu, not the whole experience, unless returns genuinely dominate your post-purchase conversations. If everything leads to a refund flow, you’ll often increase returns rather than reduce confusion.
Can QR codes help with feedback as well?
They can, but timing matters. Research from Qualtrics highlights how QR codes can be used at touchpoints to collect feedback and connect physical and digital experiences. The key is not to mix that up with support. When someone’s frustrated or stuck, that’s not the moment to ask for a survey. Support QRs should focus on solving the problem first. Feedback can come later, once things are calm.
Can I change what a packaging QR opens after products have shipped?
Yes, and that’s one of the main reasons to avoid fixed QR links on packaging. With a setup like the one described in this guide, the printed QR stays the same while the destination can be updated later. That means you can tweak setup steps, add troubleshooting paths, or change where scans route without touching the packaging. It’s especially useful once you start spotting noisy products through scan and support data.
How do I stop QR code scans from becoming just another support channel?
By deciding the job of the QR before it ever reaches support. The most effective setups let customers self-serve first with a clear menu, then escalate only when needed. When escalation does happen, the product context is already known, so support stays fast and focused. That way, QR supports your existing workflow instead of creating a parallel one.
What do most merchants start with when rolling this out?
Most start small. They pilot a handful of SKUs that already cause the most post-purchase questions, usually setup-heavy or care-heavy products. Once the scan flow, routing, and tagging feel solid for those items, expanding to the rest of the catalogue becomes far easier and far less risky.
What does the AskDolphin QR code actually do after someone scans it?
It opens the right help experience you’ve set for that QR code. Depending on what you choose, a scan can show a quick support menu, open product-specific setup and troubleshooting, or start a chat straight away. You can also track what people click and update the destination later, which is handy for packaging QRs that need to stay useful over time.
Wrap-up: What to do next?
If you take nothing else from this, keep it simple. Start with a small pilot. Pick ten SKUs that already cause the most questions. Build a fast first screen that gets people moving in one tap. Make sure there’s a clear way to ask for help when self-serve isn’t enough. Track what actually gets resolved and which products keep coming back noisy. Once that’s working end to end, scaling it up is straightforward. If it’s not working for ten products, it won’t magically work for a hundred.
If you want packaging scans to land in one shared inbox, with the product context already known and a clean handoff to a human when needed, you can use AskDolphin to manage QR flows, chat, and routing in one place. It takes a lot of the glue work out of post-purchase support.
If you want the wider picture, including how QR fits across in-store, unboxing, and post-purchase moments, read QR Code Customer Support: In-Store and Post-Purchase next. It ties the whole strategy together.
The main thing is this: Don’t overthink it! Get something live, watch real scans, and let customer behaviour guide what you fix next.

About author