Help centre articles

Install AskDolphin on Webflow

Connecting AskDolphin to Webflow takes a few clicks and no code. Authorize your site, publish it to show the live chat, and train Dolphin AI on your pages so it can answer your visitors.

Updated

install-askdolphin-on-webflowinstall-askdolphinPublicNoindexAskDolphin

AskDolphin adds live chat and Dolphin AI to your Webflow site, with no code to copy. Dolphin AI answers your visitors from your own pages and CMS items, and your team can take over any chat from the AskDolphin inbox.

In this article, you’ll learn:

  • How to connect your Webflow site to AskDolphin

  • How to publish your site so the chat appears

  • How to train Dolphin AI on your pages and keep it up to date

  • How to hide the chat for a while or remove AskDolphin from Webflow

Let’s get started and make your setup process as simple as possible!

Note: You don’t need to copy any code. AskDolphin adds one small script to your site through Webflow’s official Custom Code feature. Using a different platform? See how to install AskDolphin on Framer, on Shopify or on any website with code.


Before you start

Make sure you have:

  • An AskDolphin account. The Free plan works. If you don’t have one yet, create your account first.

  • Owner or admin access to that account. Only the account owner or an admin can connect a site.

  • A Webflow site you can edit and publish.

You can connect one Webflow site per AskDolphin account.


Connect your Webflow site to AskDolphin

Step 1: Open the Webflow integration

Log in to your AskDolphin panel and go to:

Integrations > Webflow

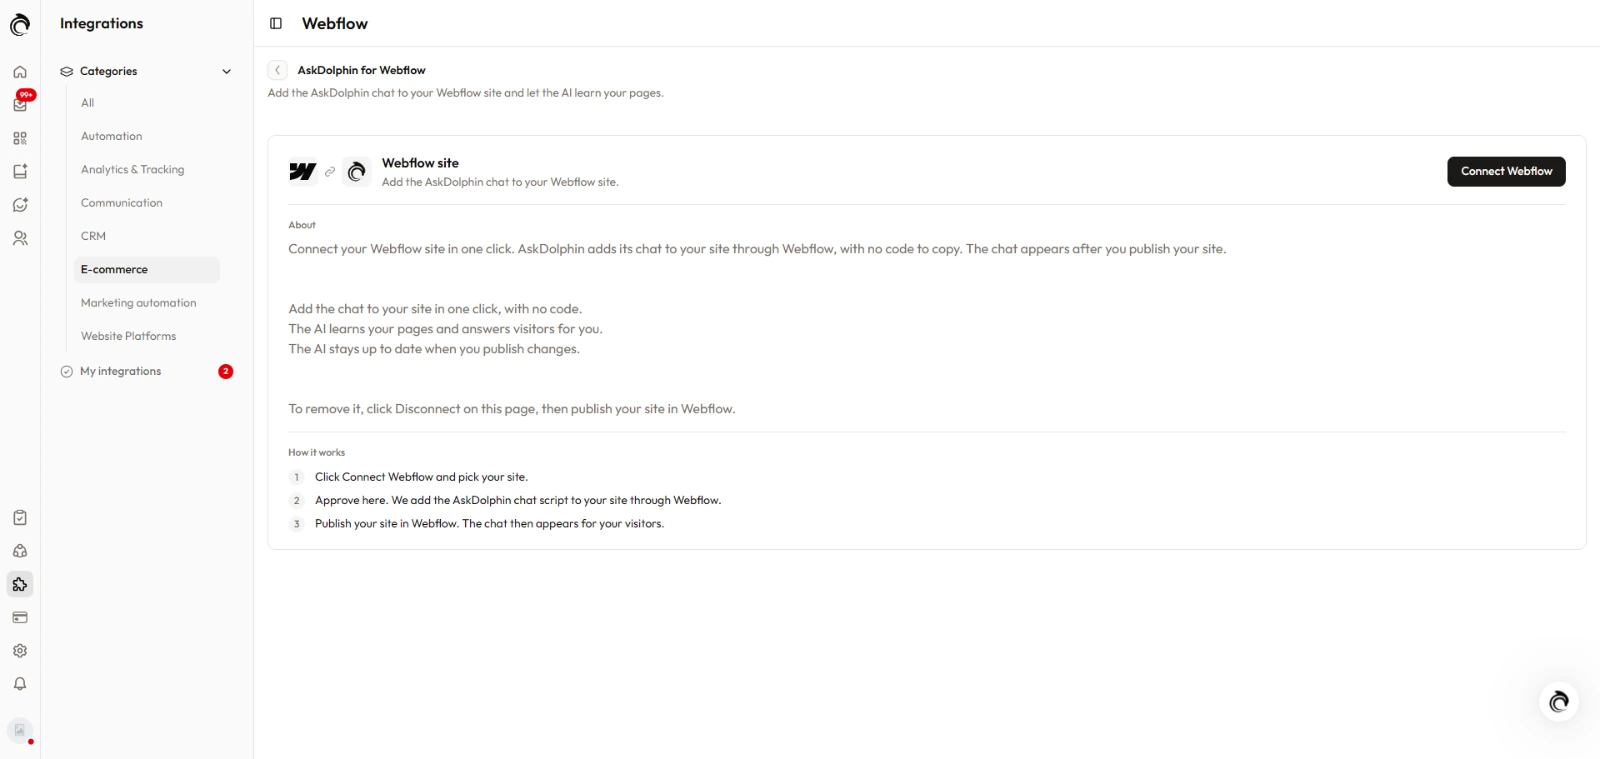
Click Connect Webflow.

AskDolphin Integrations page for Webflow with the Connect Webflow button, before a site is connected

You can also install AskDolphin from the Webflow Marketplace. It takes you through the same steps.


Step 2: Pick your site and authorize AskDolphin

Webflow opens its own permission screen and lists what AskDolphin can access.

Select the site you want to connect and click Authorize App.
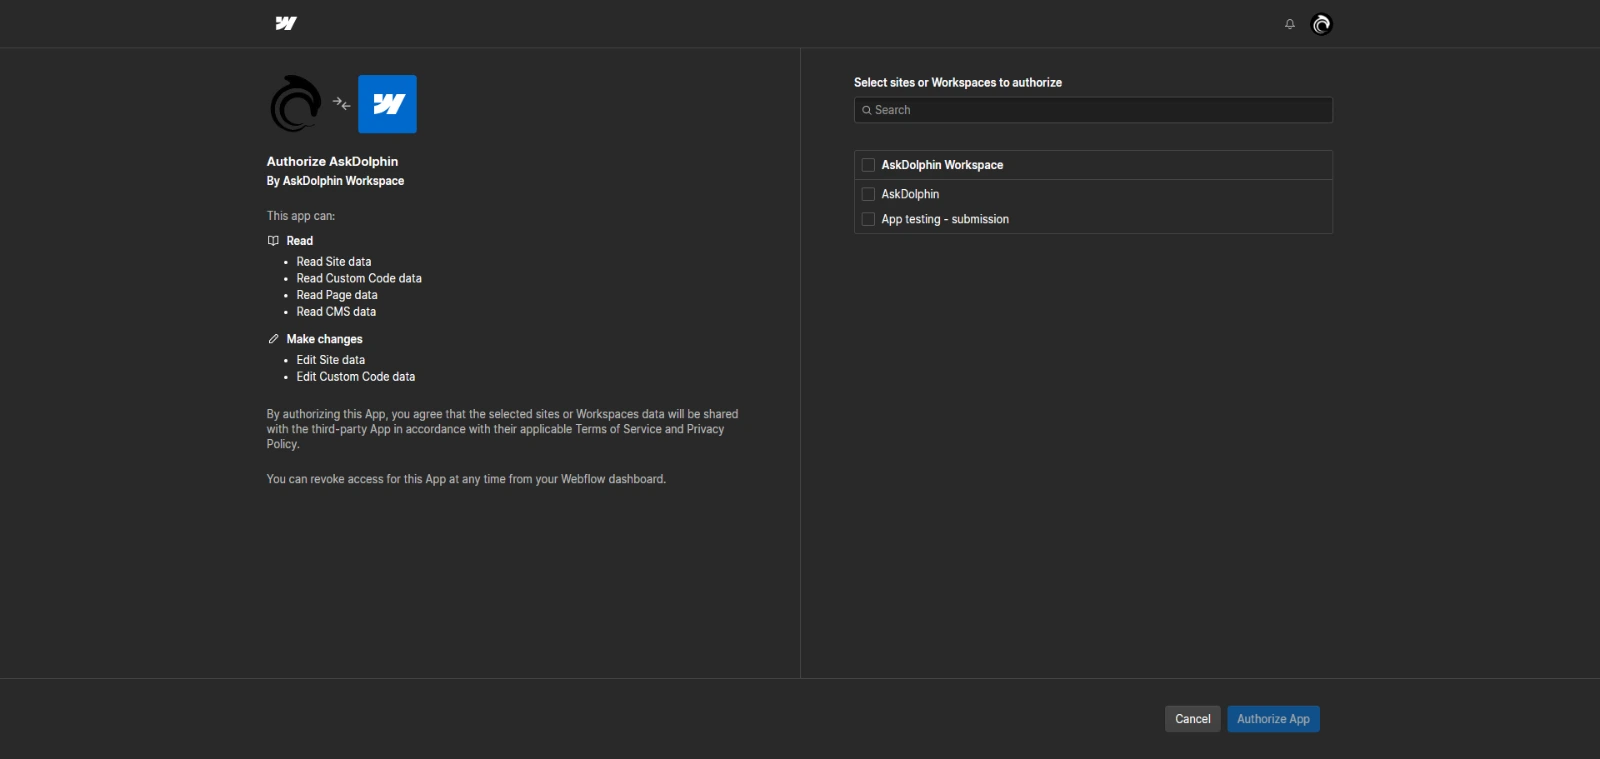
Webflow permission screen for AskDolphin listing what the app can access, with the sites to choose from and the Authorize App button

If you click Cancel instead, nothing is connected.


Step 3: Confirm the connection in AskDolphin

Webflow sends you back to AskDolphin. If you aren’t signed in yet, sign in or create your account first, and you’ll land on the Webflow page.

Check the site and the AskDolphin account it will join, then click Connect.
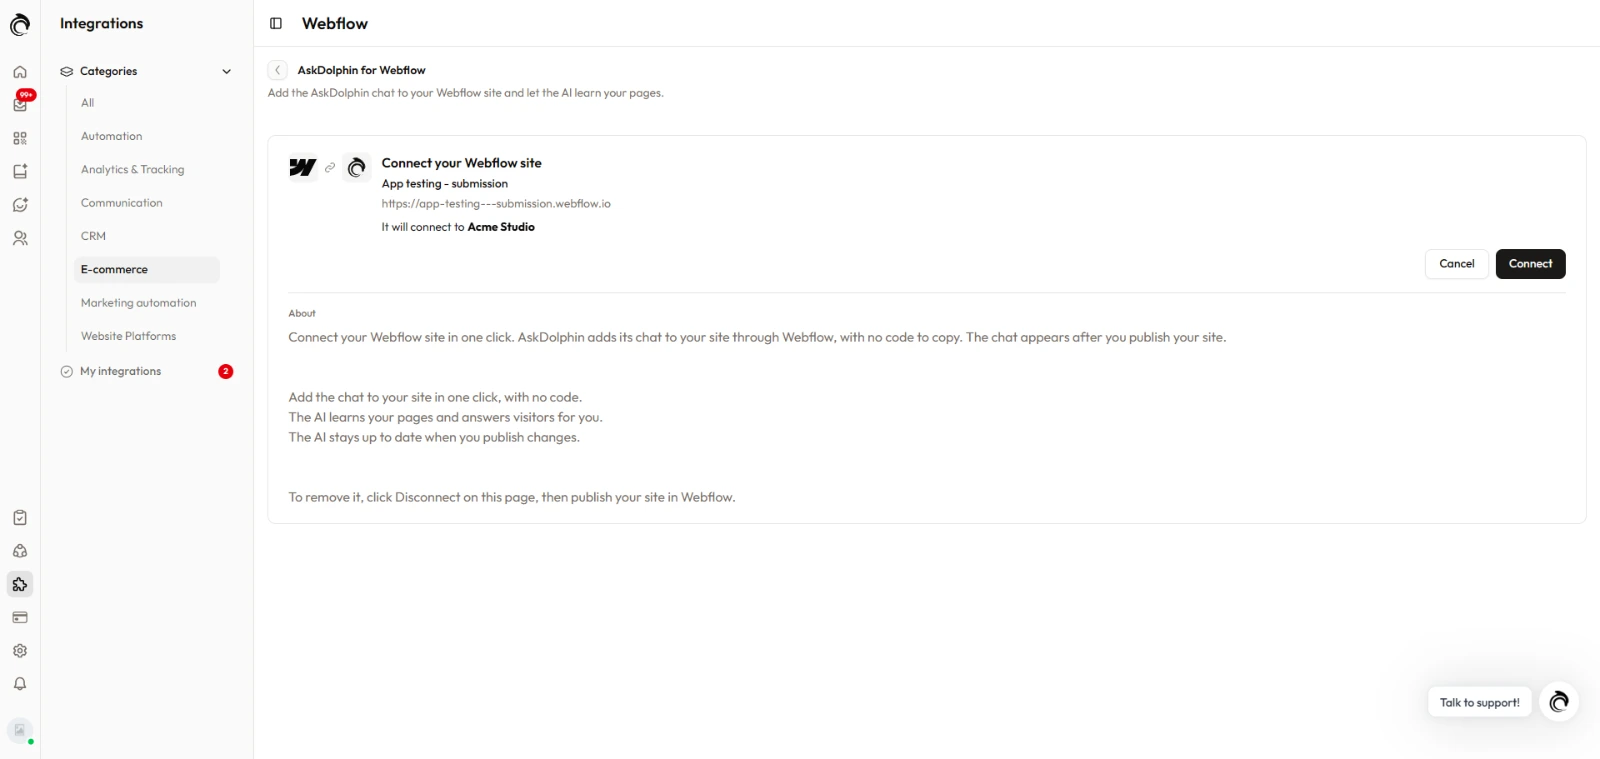
AskDolphin card to confirm the connection, showing the Webflow site name, its address and the account it will join, with the Connect button


Publish your site to show the chat

AskDolphin adds one small script to your site through Webflow’s Custom Code API. It loads the AskDolphin chat. Like any custom code in Webflow, it goes live only when you publish.
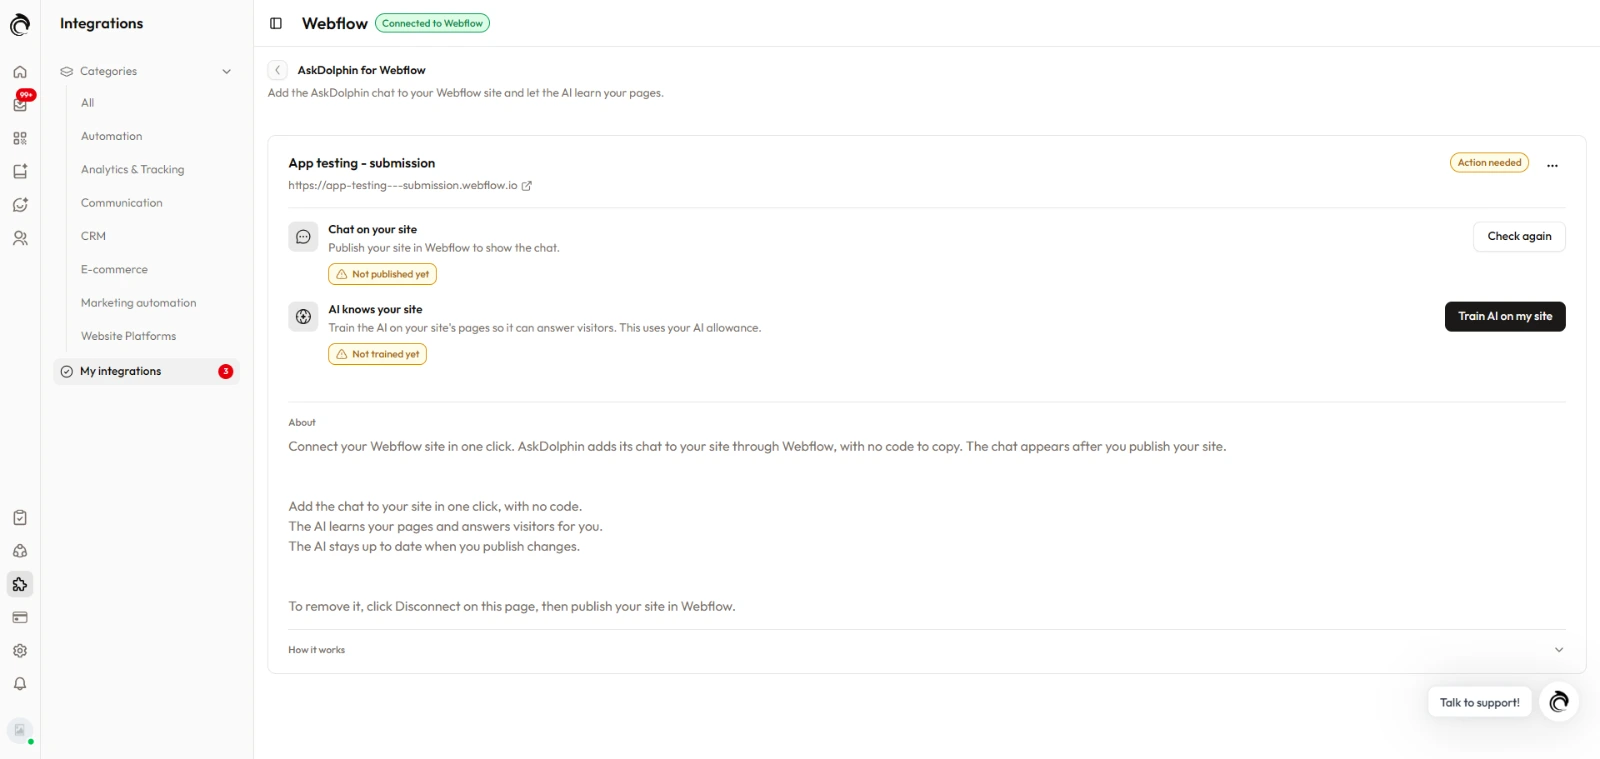
AskDolphin Webflow page after connecting, showing Not published yet with a Check again button and Not trained yet with a Train AI on my site button


Step 1: Publish your site in Webflow

In the Webflow Designer, click Publish.

Step 2: Check the chat in AskDolphin

Go back to the Webflow page in AskDolphin and click Check again. You’ll see The chat is live on your site.

Visit your site and refresh the page to make sure the AskDolphin chat is visible and ready to use.

Animation of a cursor clicking the round blue AskDolphin chat button, which opens the chat window.

You’ve successfully installed AskDolphin on Webflow.


Train Dolphin AI on your Webflow site

Dolphin AI can answer your visitors from your own pages. Nothing is trained until you start it, because training uses your Dolphin AI allowance.

Step 1: Start the training

On the Webflow page in AskDolphin, click Train AI on my site. You can also start it from the Train the AI on your Webflow site box in AI Data Sources.
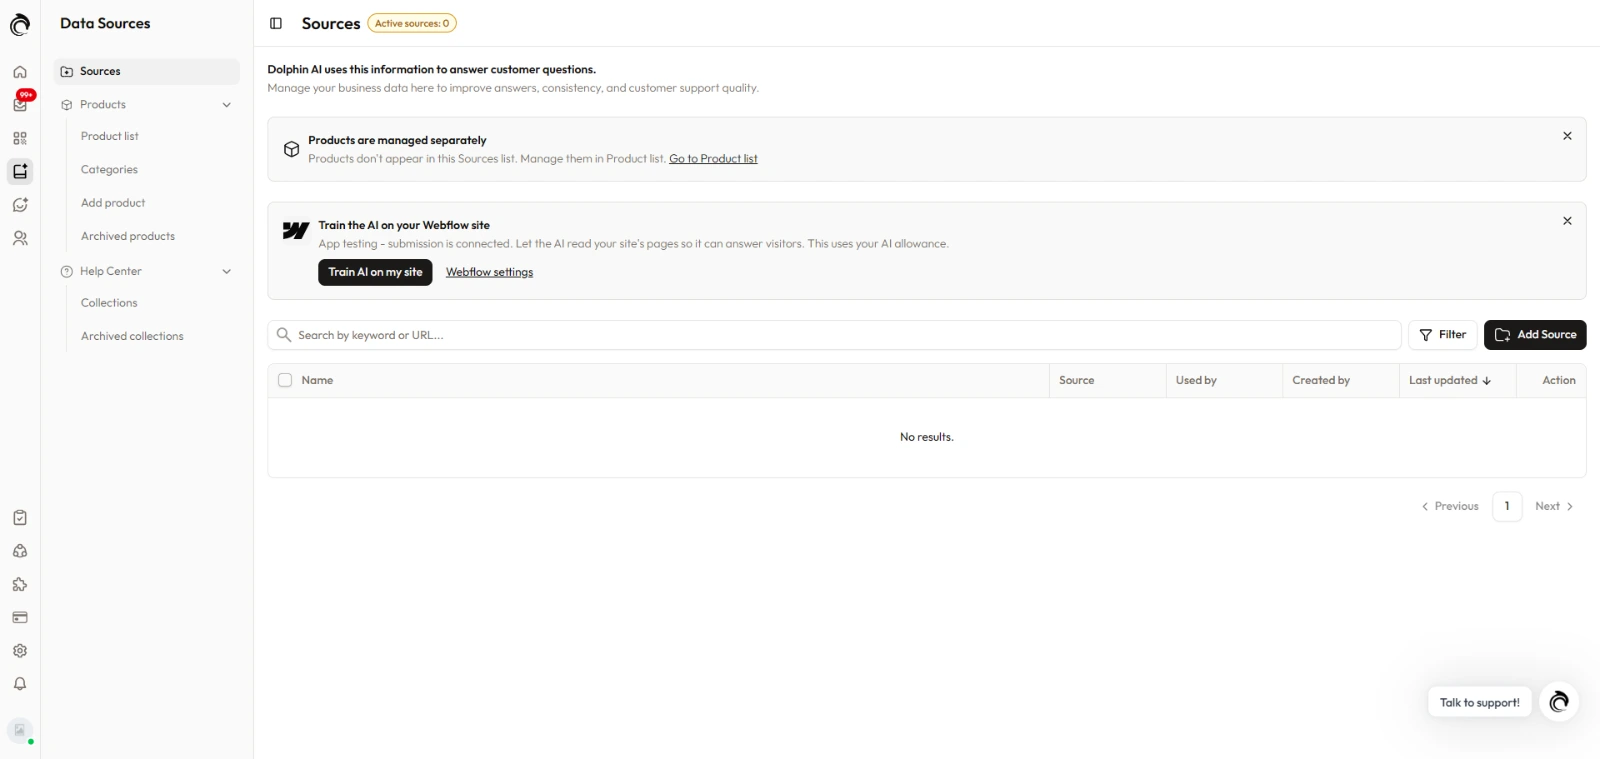
AskDolphin AI Data Sources page with the Train the AI on your Webflow site box and its Train AI on my site button


Step 2: Let AskDolphin read your pages

AskDolphin reads your published pages and CMS items, such as blog posts, and turns them into answers for the chat. A progress bar shows how far it is.

Step 3: Check your pages in AI Data Sources

When it’s done, your pages are listed in AI Data Sources, and the Webflow page shows that the chat is live and the AI knows your site.
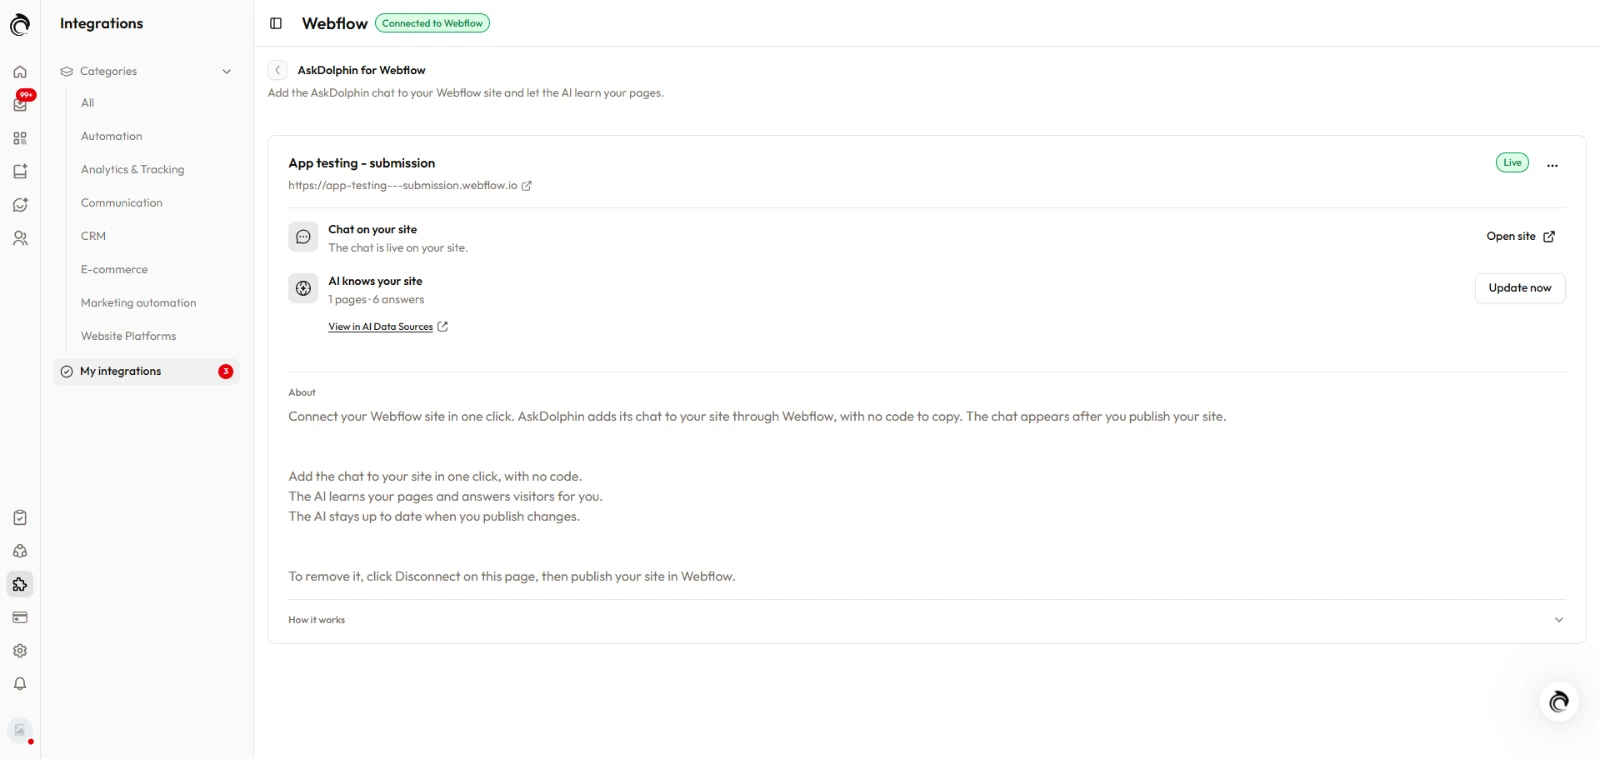
AskDolphin Webflow page with a Live status, showing the chat is live on the site and the AI has learned its pages, with an Update now button


Keep the AI up to date

After you publish changes in Webflow, AskDolphin updates the AI within a day. Only pages that changed are trained again, new pages are added, and removed pages are deleted.

To update right away, click Update now on the Webflow page in AskDolphin.


Answer your visitors in the AskDolphin inbox

Every conversation from your Webflow site appears in the AskDolphin inbox, together with your live chat, email and QR conversations. Your team can reply, take over from the AI, add notes and transfer chats.


Temporarily hide the chat

If you want to hide the chat for a short time without disconnecting your site, you can turn it off in your AskDolphin panel.

Go to Settings > Channels > Live Chat widget and switch off the Enable Live Chat widget toggle at the top of the page.
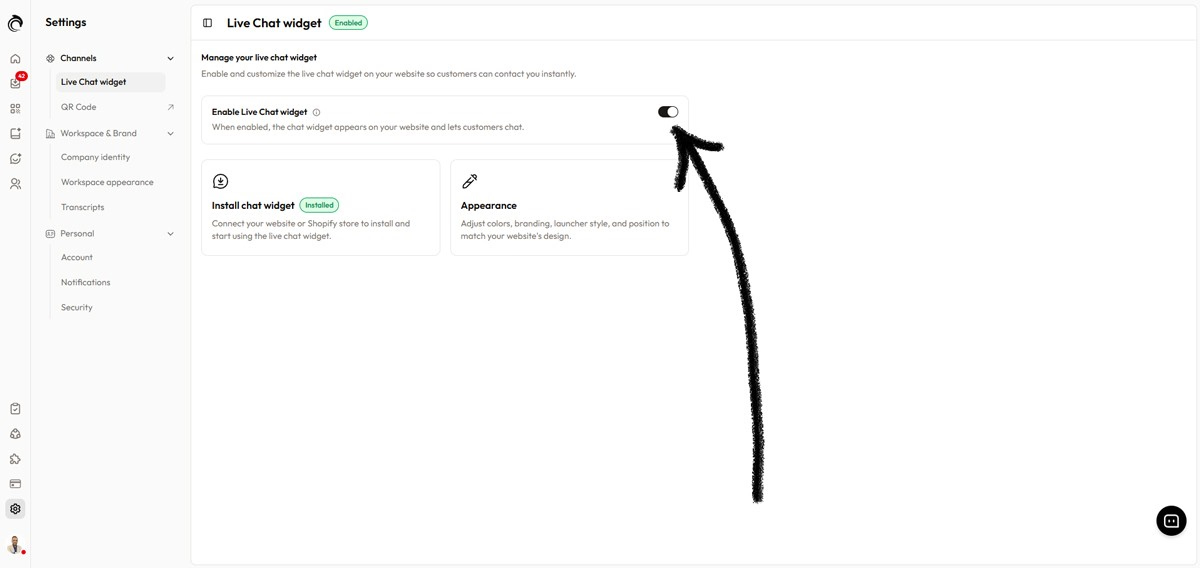
AskDolphin Live Chat widget settings showing toggle to disable chat widget on website

Your Webflow connection stays in place, so you can turn the chat back on at any time without connecting again.


Remove AskDolphin from Webflow

You can remove AskDolphin in either of these ways:

  • In AskDolphin: open Integrations > Webflow, click the ⋯ menu and choose Disconnect.

  • In Webflow: open Site settings > Apps & Integrations and remove AskDolphin.

Both remove the AskDolphin script and AskDolphin’s access to your site. Disconnecting also removes your site’s pages from AI Data Sources.

Then publish your site in Webflow once more, so the chat disappears from your live site.

Removing AskDolphin from another platform? See Uninstall AskDolphin.


Plans and billing

AskDolphin has a Free plan and a paid Pro plan. Plans are billed by AskDolphin, not by Webflow. See AskDolphin plans and prices.


Need help?

If the chat doesn’t appear on your site, make sure that:

  • You clicked Connect in AskDolphin after authorizing in Webflow

  • You published your site in Webflow after connecting

  • The Enable Live Chat widget toggle is switched on

Then click Check again on the Webflow page in AskDolphin. If you still need help, email us at support@askdolphin.com.

Frequently asked questions

Do I need to add code to my Webflow site?

No. AskDolphin adds one small script to your site through Webflow’s official Custom Code feature, so there’s no code to copy. The script loads the AskDolphin chat, and like any custom code in Webflow, it appears on your live site after you publish.

Why isn’t the chat showing on my Webflow site?

Webflow only shows new custom code after you publish. Click Publish in the Webflow Designer, then go back to the Webflow page in AskDolphin and click Check again. When it says The chat is live on your site, refresh your website to see the chat.

How does Dolphin AI learn my Webflow site?

Click Train AI on my site on the Webflow page in AskDolphin. It reads your published pages and CMS items and turns them into answers. After you publish changes, it updates within a day, or right away when you click Update now. Training uses your Dolphin AI allowance.

How do I remove AskDolphin from Webflow?

Click Disconnect in the ⋯ menu on the Webflow page in AskDolphin, or remove AskDolphin in Webflow under Site settings > Apps & Integrations. Then publish your site once more, so the chat disappears from your live site.

Why Use AskDolphin?Discover how AskDolphin transforms customer service through AI, automation, and real-time chat, helping you deliver faster, smarter, and more personalized support.Get Startedget-startedwhy-use-askdolphin1
Install AskDolphin on FramerInstalling AskDolphin on Framer is quick and straightforward. With the AskDolphin Framer plugin, you can connect your Framer website to your AskDolphin account, install the live chat widget, and start chatting with your website visitors.Install AskDolphininstall-askdolphininstall-askdolphin-on-framer2
Creating and Setting Up Your AccountWelcome to AskDolphin! This guide will help you take the first steps in setting up your account and using our platform to provide smarter, seamless customer support. By the end of this article, you’ll be ready to get started with AskDolphin and connect with your customers effortlessly.Get Startedget-startedcreate-account1
Install AskDolphin on WebflowConnecting AskDolphin to Webflow takes a few clicks and no code. Authorize your site, publish it to show the live chat, and train Dolphin AI on your pages so it can answer your visitors.Install AskDolphininstall-askdolphininstall-askdolphin-on-webflow2
Installing AskDolphin on Your Website (Overview)A quick overview of installing AskDolphin on your website, and which guide to follow for Shopify, Framer or any other site.Get Startedget-startedinstall-askdolphin-overview1
Install AskDolphin on WordPressInstalling AskDolphin on WordPress takes a few clicks and no code. Install the plugin, connect your site, and train Dolphin AI on your pages and posts so it can answer your visitors.Install AskDolphininstall-askdolphininstall-askdolphin-on-wordpress2
Start Using the AskDolphin PanelIn this article, we’ll guide you through the most important features of the AskDolphin panel. By the end, you’ll know how to easily navigate the platform, manage team operations, and provide excellent support to your customers.Get Startedget-startedstart-using-the-askdolphin-panel1
Sell your WooCommerce products with AskDolphinIf your WordPress site runs WooCommerce, AskDolphin can sell your products in chat. Dolphin AI answers about your products, adds them to the cart and sends visitors to your checkout.Install AskDolphininstall-askdolphinsell-woocommerce-products-with-askdolphin2
Unable to Log InThis article provides guidance on resolving common login problems and helping you regain access to your AskDolphin admin panel. Whether you've forgotten your password, misplaced your account email, or encountered the Trial Expired message, we're here to assist you.Get Startedget-startedunable-to-log-in1
Install AskDolphin on your WebsiteAdding AskDolphin to your website is quick and straightforward. You have two options to get started: installing the AskDolphin plugin on your web platform or adding the AskDolphin JavaScript code to your website's code.Install AskDolphininstall-askdolphininstall-askdolphin-on-your-website2
Install AskDolphin on ShopifyInstalling a live chat widget like AskDolphin helps you engage customers on your Shopify store. AskDolphin lets you sync your product catalog, enabling product-specific chats and giving Dolphin AI access to your product details so it can answer customer questions from them. This helps you provide a personalized shopping experience and improve communication efficiency.Install AskDolphininstall-askdolphininstall-askdolphin-on-shopify2
Contact AskDolphin SupportWhen you have questions or need assistance, the AskDolphin Support team is here to help! This guide will walk you through the available support options. Our goal is to ensure your experience with AskDolphin is seamless, efficient, and hassle-free.Get Startedget-startedcontact-askdolphin-support1
Uninstall AskDolphinThe uninstallation process of the AskDolphin widget varies depending on the platform your website uses. In this article, we will guide you through the most common uninstallation methods.Install AskDolphininstall-askdolphinuninstall-askdolphin2

Stop losing the quiet ones.

Install it in a minute. It starts working on your next visitor.

14 days, every feature.